torsdag 19 november 2009

Ära vare gud i höjden, denna har jag gjort i slöjden!

Nu är Umbilical Connectorn tillverkad. Den består av ett antal komponenter, som alla samspelar för att uppnå önskad funktion. Dummyn är bockad av 1mm aluminium plåt, där bryggan är limmad med cyanakrylat (Även kallat superlim). En mikrobrytare är även den fastlimman i bryggan med cyanakrylat. Kretskortet är riktigt bra lött. På kretskortet sitter det sex stycken anslutningshattar, med fjädrar inuti som kommer garantera kontakt under hela resan. En mini D-sub 9 kontakt reläar signalerna in till elektroniklådan.

The Umbilical connector is manufactured. It consist of a number of different parts that all are integrated for the task. The dummy is bent by using 1mm aluminum plate and both the micro switch and the bride is glued with cyanacrylate. Soldering the circuit board when well. Six connector spring loaded connector hats and the signals are relayed into the electronics box with a min D-sub 9 pin connector.


En vanlig D-sub 9 connector ansluter Rocket Socket med NSSB. Själva boxen är tillverkad av materialet VeroWhite. Ett stort tack till Top Notch Design som tillverkade den med deras 3D-skrivare. Sju pinnar går upp i Dummyn ifrån Rocket Socket. Sex elektriska samt en mekanisk.
An ordinary D-sub 9 connector connects Rocket socket with the NSSB. The structure is manufactured by Top Notch Design and they used their 3D-printer to create the rocket socket with the material VeroWhite. Seven pins are inserted into the dummy, six electrical and one mechanical.

Som sett ovan på de två bilderna så liknar de tillverkade delarna det som var uttänkt i vid design i Solid Egde. Det är en speciell känsla att få en kravspesifikation och lösa uppgiften fram tills den skall användas. HÄRLIGT!

As seen in the two pictures above so resemble the manufactures parts the idea that was created in Solid Edge. It's a special feeling to be handed a specification of the requirements, and through hard work and a lot of idea bouncing between the smart team members be able to sit with the thing that's created in your hand, and know it's going to be used for its application.
AWESOME!

fredag 13 november 2009

Successful cutter test with panels and batteries.

Yesterday we succeeded with opening the hatches with the cutter powered by batteries.


This test was with 7.1Ω resistors and batteries. The batteries are used and the fact that we are able to open the hatches in just below 5 seconds is good start. The current was still a bit lower then we would like it so for next test we should probably use resistors with an even lower value, maybe around 6Ω.

Have a nice weekend.

onsdag 4 november 2009

Inflation!

The movie show how we have tested the airbag-parachute system. Soon it will be finished : )


tisdag 27 oktober 2009

Inflation test

The airbag was attached to the tank which was filled with around 6 g of co2.

1.5 W seemed not to do the trick so I tried to raise the current (not easy with a stick, hiding behind a vacuum cleaner, afraid of exploding airbags)

Please fast forward to 1:40 where the inflation takes place.

You will hear a "pop" at the end of the inflation which is the temporary silicone sealing at the wires breaking.

A conclusion is that inflating the airbag works, and it is in a slow manner which is good.

Also, care must be taken while sealing the wires and the pressure sensor.

onsdag 7 oktober 2009

Efter en hel del strul så blev slutligen den senaste versionen av koldioxidtanken äntligen redo att testas. Tanken fylldes med 4 gram kolsyreis, vilket ger upphov till ungefär 2 liter gas vid rumstemperatur och atmosfärstryck. Det första testet var att se om tanken höll tätt, vilket utfördes genom att lägga ner den i en hink vatten. Resultatet, som kan ses i filmen nedan, visade att tanken läckte vi den yttre o-ringen, men 1 bubbla var 6 sekund. Den lilla o-ringen vid ventilen, som tidigare har läckt, visade sig hålla tätt däremot.

Efter detta genomfördes även ett "release test" av ventilen, detta med väldigt gott resultat, som kan ses i den andra filmen i inlägget. Ventilen öppnas på mindre än 1s när strömmen slås på, det huvudsakliga gasutsläppet sker de första sekunderna, men ett långsamt utsläpp av gas kan även noteras under perioden 5-20 s efter starten.

After quite a few problems on the way, the final version of the cartridge was now ready to be tested. The tank was filled with 4 grams of CO2 ice, which equals roughly 2 litres of gas at room temperature and atmospheric pressure. First a leakage test was conducted (see video below), performed by placing the tank in water, where 1 bubble was seen from the outer o-ring every 6 seconds. The smaller o-ring by the valve was air-tight however, which was a very good result.

After this, a release test was performed with the electrovalve, with a good outcome (see second video). The valve is opened in less than 1 second after the current is turned on. The main gas release takes place the first seconds, however a slow release of gas can also be noted during the time period 5-20 seconds.

Videos:

Leakage test

Release test

onsdag 23 september 2009

Elektroniklåda klar

KTH original
Efter många timmars fräsande är elektroniklådan klar. Nu kan ett antal tester utföras för att se om konstruktionen är rätt. Vi hoppas.

After many hours of milling the electronics box is finished. Now we can peform several test to verify the construction. We hope it is correct.

Uppenbarligen kommer The Borg rippa vår design för sina moderskepp. De måste finna vår prob i rymden och assimilera den.

Obviously, The Borg will ripp off our design for their motherships. They must find our probe in space and assimilate it.


Borg ripoff

- "Resistance is 0.2 Ohms."

tisdag 15 september 2009

Explore Space!

Hela tanken bakom REXUS-programmet är att vi studenter ska fö möjligheten att lära oss en himla massa om rymdprojekt, och det har vi helt klart gjort så här lång.. Men, så tänkte vi att "Det vore ju synd och skam om all kunskap bara stannar här hos oss..", så nu har vi även givit oss i kast med att föra kunskapen vidare! Första tillfället blev ett besök av en grupp rymdinstresserade ungdomar från Malmö, Helsingborg och Karlstad, i samarbete med programmet Explore Space (http://vetenskapenshus.se/ES/).
Under ett par timmar fick eleverna följa experimentutvecklingen från start till nuvarande design, de fick vara med på ett test av airbagarna och de fick lära sig om allt möjligt från norrsken till digital elektronik. Några utvalda bilder syns nedan, och fler finns att hitta på http://www.spp.ee.kth.se/edu/rexus2008/bilder/explore_space/


The basic idea behind the REXUS program is to give us students the opportunity of learning loads about space projects, and we've really learnt a lot so far.. But, now we thought that "Wouldn't it be a shame if all our experiences were all just gathered here with us?" and thus we decided also to start sharing it with others! First in line was a visit from a group of space interested students from all over Sweden (Malmö, Helsingborg and Karlstad) as a part of the Explore Space program (http://vetenskapenshus.se/ES/). During a couple of hours, the students got to follow the experiment development from day 1 to the current design, they took part in the first testing of the new airbag design and they were taught about loads of stuff like the Aurora and usefullness of digital electronics. A few selected images are shown below, and more are available on http://www.spp.ee.kth.se/edu/rexus2008/bilder/explore_space/


måndag 14 september 2009

The Incredible Hulk...

För att vi ska få plats med airbagarna och att de ska fällas ut rätt måste dessa vikas på ett smart sätt. De behöver också hållas fast. Annars kan dem trassla ihop sig eller hoppa ut medan vi packar in dem. Det är bra om dem inte nuddar luckan heller. Den blir ju varm vid återinträdet och airbagarna kan skadas.

Filmen visar några metoder att knyta airbagarna. Först vanlig bomullstråd, sedan aluminiumfolie, och sist papper.

The airbags must be folded to fit them inside LAPLander. And to make sure that they don´t get out while we are packing, they must be tied. Also, the hatch become hot and can damage the airbags, so they should not touch the hatch.

This movie show some methods of tying the airbags. First ordinary cotton sewing thread, then aluminium foil, and last paper.

onsdag 19 augusti 2009

LAPLander på Wikipedia/LAPLander on Wikipedia

Nu kan Wikipedias användare läsa om LAPLander på svenska, engelska, franska och spanska.
Klicka på länkarna ovan för att läsa de olika versionerna.

Now may users of Wikipedia read about LAPLander on Swedish, English, French and Spanish.
Click on the links above to read the different versions.

onsdag 5 augusti 2009

Critical Design Review

Den 23 Juli var det dags att genomgå en "Critical Design Review" (CDR), där alla inblandade från ESA, Rymdbolaget och DLR genomför en kritisk granskning av projektet. Inför detta har vi förberett inte mindre än 162 sidor dokumentation med designbeskrivning, termisk och aerodynamisk analys, ritningar etc..

Väl på plats i Tyskland så gick CDRen strålande! Bortsett från ett par småjusteringar var alla nöjda med allting, och rapporten belönades ett inofficiellt "Excellent!".


On Juli 23rd it was time to face the feared "Critical Design Review", where all of the involved personell at ESA, SSC and DLR do a critical review of the project.
We had prepared no less than 162 pages of documentation, including design details, thermal and aerodynamical analysis, mechanical drawings etc..

When in place in Germany, our CDR performance was excellent! Apart from a few minor adjustments, everyone was satisfied with everything, and the report was awarded an inofficial "Excellent!".

onsdag 22 juli 2009

Ejecting hatches...


När jag slår på strömmen värms resistorerna upp och repet går fort av. Nu är det bara bygga den på riktigt...

When I turn on the power the resistors heats up and soon the rope breaks. Now its only needs to be built for real...

Första gyrot är klart / First gyro is finished

(Swedish, text in english below)

Slutligen har lödarbetet tjuvstartat. Den första av totalt 4 gyrokretsar är klar, nu återstår att testa om den fungerar. Den största utmaningen är att löda gyrot som är en BGA (Ball Grid Array) vilket betyder att alla lödpunkter är lodkulor på undersidan av paketet. Förhoppningsvis har det gått bra men det går inte att veta säkert utan att röntga. De andra komponenterna är 7 kondensatorer och en resistor i 0603 paket (1.6 mm × 0.8 mm).


(English)

Solder work has started. The first of a total of four gyros is finished, only testing remains. The biggest challenge is to solder the actual gyro itself since it is an BGA (Ball Grid Array) which means that all connections consists of solder balls on the bottom of the package. Hopefully everything went well but it's impossible to know unless you X-ray the circuit. Other components are 7 capacitors and a resistor in 0603 package (1.6 mm × 0.8 mm).

Världsrymden signalerar / message from space!

(Swedish - Text in english below)

För att hålla reda på var någonstans i den lappländska ödemarken vår sond dimper ner kommer den att vara utrustad med en GPS-mottagare. För att denna värdefulla information skall nå fram till oss i från denna GSM-befriade ödemark är LAPLander även utrustad med ett litet sattelitmodem, STX2.

För att kunna skicka ett meddelande med modemet krävs det en "mjukvara" som kan kommunicera med och berätta för modemet vad som ska skickas. Och efter en flera dagar lång och hård kamp mot en bångstyrig FPGA samt avancerad diplomati med ett satellitmodem (som först vägrade acceptera mina kommandon) hade vi äntligen en mjukvara stabil nog för att göra ett första sändningsförsök.

En mycket sofistikerad testrigg byggdes genast upp (med en väl avvägd mängd kabeltrassel) och en noga utvald bit expanderad polystyrenplast (första bästa bit med rätt form som hittades på labbet) utgjorde en "bom" vid vilken antennen omsorgsfullt fästes (attack-tejpades) och sedan stacks ut genom ett fönster. Vi skapade sedan ett testmeddelande innehållande Hex-koden 59 (ascii-koden för 'Y').


När vi kontrollerat att allt var uppställt enligt planerna och slagit på spänningen till modemet skickade vi sändkommandot till modemet. Med stor ivrighet loggade vi in på AeroAstros kundsida och klickade förväntansfulla på sidan som visade mottagna medelanden...

Givetvis hade ingenting kommit fram. Modstulna gjorde vi ytterliggare ett par sändförsök och väntade ytterliggare några minuter utan resultat. Då upptäckte vi att det modem som var registrerat på hemsidan inte var det modem vi använde till testerna. En strimma hopp tändes i oss och vi registrerade genast det nya modemet och gjorde sedan ytterliggare ett par sändförsök. Och till slut, när vi nästan gett upp hoppet såg möttes vi av denna fantastiska syn:


Meddelandet hade kommit fram! och innehöll till och med samma information som vi skickat, allting fungerade precis så där bra som teknik ibland har en tendens till att inte göra :)

(English)

In order to know where in the vast wilderness of northern Sweden our probe will land it will be equipped with a GPS to acquire its position and a satellite modem (named STX2) to send that information back to us.

The modem also needs some software to communicate with it and tell it how to behave and what it should transmit. And after a long and fierce battle with an unruly FPGA and some advanced diplomacy with a satellite modem (who at first refused to acknowledge my commands) the software was finally stable enough for some transmission test attempts.

We quickly constructed a makeshift test setup and mounted the antenna on a boom which we stuck out of a window. We also made up a test message containing the hex code ‘59’ (ascii code for the letter Y).

When we checked that everything was arranged according to our plans we sent the transmission command to the modem. We then logged on to AeroAstros customer portal and then clicked us to the page showing new messages and waited with great anticipation.

Naturally nothing had happened. Resigned we made a few more sporadig transmission attempts and waited a few minutes more. But then we the discovered that the modem registered on the customer portal wasn’t the one we used in the tests. A smal ray of hope was lit in us and we hurried to register the modem used in the test and did som more transmission atemts. And finaly, when we had lost almost all our hope we saw that the message had come trough. Everything worked just as it was supposed to :)

måndag 20 juli 2009


Mina dagar i Rom börjar närma sig mot sitt slut. Här har jag varit sedan den 8 juli och arbetat med GAUSS (Gruppo di Astrodinamica dell' Universita degli Studi 'la Sapienza'). Dem har byggt satelliter och har ett experiment ombord på Rexus kallat BUGS www.bugsteam.com/Background.htm. Just nu när jag skriver detta sitter jag här i deras stökiga labb/kontor och väntar på att slutföra det sista testet. Och italienarna packar i ned allt i flyttlådar, imorn ska det mesta skickas bort!


Det är lite lustigt att universitet ligger precis bakom kolloseum. Horder av turister trampar dessa marker och dem går förbi universitet regelbundet eftersom det sitter ihop med en av attraktionerna; en del av huset delar faktiskt byggnad med en gammal kyrka som Michelangelo har en skulptur i (moses). Självklart trissar alla turister upp priserna. Detta har italienarna löst genialiskt genom att ha två priser, ett för italienare (hemligt förstås) och ett för turister. Så, utan sällskap eller god italienska, får man slänga upp plånboken. Hårt för en student... Som tur är finns en liten butik i universitet där studenterna kan köpa mackor och dricka på rimliga villkor. Och vilka villkor! En riktigt schysst macka och en dricka kostar bara 2.5 euro, jämför det med biblioteket på KTH... Och kanske inte helt förvånande, finns inte mindre än fyra espressomaskiner utanför butiken...


Nu åker datorerna ner i lådorna, snart är det väl bara mitt byggbord kvar... LAPlander ska ha luckor för att skydda fallskärmen och airbagsens när den återinträder i atmosfären. På lämplig höjd ska luckorna separera från landaren. Hur ska man göra detta? Jo genom att fästa luckorna med ett rep som klipps. Denna mekanism, den vi helt enkelt kallar "cuttern", utvecklas här. Cuttern kommer bestå av överbelastade resistorer som smälter repet (dyneema). Hittills har jag kappat detta rep 74 gånger! Prövat olika motstånd och med olika spänning. Senare idag kommer jag bygga en LAPlander dummy att testa.


Nu har jag byggt den, och den fungerar! Återkommer senare...


(English verison)
My days in Rome is soon coming to its end. I have been here since the 8th of july and worked with GAUSS (Gruppo di Astrodinamica dell' Universita degli Studi 'la Sapienza'). They have built satellites and have an experiment omboard Rexus called BUGS www.bugsteam.com/Background.htm. Right now, when I´m writting this, I´m sitting in their messy laboratory/office and waiting for finishing the final test. And the italians are packing everything in boxes, tomorrow most of it will be sent away!


It´s interesting that the university is so close to the colloseum. Hords of tourists walk this area and they walk past the university since it is attached to a one of the attractions, an old curch that Michelangelo have a sculpture in (moses). Because of all tourists the price is high. This have been solved geniously for the students by having two prices, one for italians (secret ofcourse) and one for tourists. Hard for me... Luckily there is a store in the university where they have nice prices and four espresso machines...


LAPlander will have hatches to protect the parachute and airbags during reentry. The hatches should separate at proper altitude. How should this be done? Well, by holding the hatches by a rope and cut it. This mechanism, simply called the "cutter", is developed here. The cutter will consist of overloaded resistors that melts the rope (dyneema). So far, I have cut this rope 74 times! Testing different resistors and voltages. Later today I will build a LAPlander dummy to test.


Now I have built it, and it works! More will follow...

fredag 10 juli 2009

Stödstruktur för gyron / Support structur for the gyros

(Swedish - Text in english below)


Efter ett par timmar (läs 14) framför fräsen så är de två triangelformade plastbitarna som kommer agera stöd åt 4 gyron på LAPLandern klara. Dom behövs för att säkerställa att gyrot sitter stadigt i en bestämd vinkel. Nedan syns CAD-modellen, en liksidig triangel, sidorna är 12mm och den är 16mm djup.
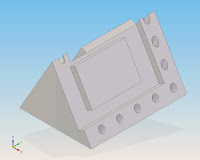
Den kan verka vara en enkel liten plastbit att göra men det är inte helt sant. Alla hålen som är på sidan är borrade i olika vinklar, för att dom måste mynna ut på rätt ställe på undersidan av triangeln. Men allt gick bra, nedan kommer en från produktionen också. ^_^

(English)

After about 14 hours in front of a milling machine the suport structure for the gyros is finished. The structure is needed in order to ensure that the gyros remains stable and always mounted at a specific angle in relation with each other. The first picture is of the CAD-model, and all the holes on the side needs to be drilled with different angels in order to get the holes on the bottom side in the correct place. The last picture is from when the first one is finished and the second one just needs to be milled in to the right lenght. ^_^

Kamera CAD/Camera CAD.

En kamera skall i mars följa med upp i rymden, och därför behövdes en CAD-modell så att dess position i LAPLandern kan planeras. Två bilder kan ses nedan.

A camera will be sent into space in mars. A CAD-model was created so the positioning of the camera inside the LAPLander can be planned in a computer. Two pictures of the CAD-model can be seen above.

onsdag 8 juli 2009

Kretskorten på tillverkning / Circuit boards in manufacturing.

(Swedish - Text in english below)

Äntligen är kretskorten skickade till tillverkaren. Det var lite problem att få tag på en tillverkare pga semestrar och dylikt, dessutom hade de flesta svenska tillverkare fullbokat i slutspurten innan ledigheterna. Men tillslut kom vi i kontakt med en tillverkare som använder en Kinesisk fabrik, varpå det kommer ta lite längre tid men så länge resultatet blir bra så är allt frid och fröjd.
Såhär blev det tillslut, svårt att se någonting men det är i alla fall ganska fina färger. ^_^


(English)

Finally the circuit boards are sent to the manufacturer. There was some problems to find a suitable manufacturer because of the upcoming vacations, and most of the Swedish manufacturers where fully booked in order to deliver as much as possible before the leave. But we finally got in contact with a manufacturer that uses a Chinese factory, which it will take a little longer to deliver but as long the result is good so everything is fine. So here's how the finished boards ended up, it's hard to see anything but the colors are very nice anyway. ^_^

söndag 5 juli 2009

kamerakirurgi / Camera surgery

(Swedish - Text in english below)

En liten kamera, ACME FlyCamOne2 - http://www.flycamone.com/ kommer att inkluderas som en del av experimentet, men innan det kan ske så behöver all onödigt tjafs som hölje och batterier avlägsnas, och start och stopp behöver kunna styras externt.
Efter mycket om om men lyckades vi bända, klippa och skära bort all onödig plast, innan vi strax därefter hittade instruktioner online om hur man öppnade kameran för att byta batteri på ett mycket mindre våldsamt sätt..
Den avskalade kameran såg rätt festlig ut däremot :)


(English)

A small camera, ACME FlyCamOne2 - http://www.flycamone.com/ will be included as a part of the experiment, in order make a recording of the airbag-parachute inflation. But, before this can be done, the camera needs to be stripped of all unnecessary materials such as the plastic cover and the battery, and it needs to be externally controlled (start/stop).
After a heap of hard work, we managed to bend up and cut away most of the cover, just before we found the easy-entrance solution posted on the web on how to exchange the battery..
The naked camera (above) does look pretty cool though.. :)

Första bilderna på tanken! / First images of the tank!


(Swedish - Text in English below)

Den första koldioxidtanken är nu färdigbyggd! Designen, som till stor del har gjorts av Christian Westlund under våren, gick nyligen i produktion hos A-MEK Verkstad i Sunne, och har i dagarna transporterats upp till Stockholm med privatflyg. Tanken kommer nu att undergå högtryckstester upp till 150 atmosfärstryck (150 bar) innan dess att den kan anses vara pålitlig och säker för våra ändamål.


(English)

The first carbon dioxide tank has now been built! The design, mostly done by Christian Westlund during the spring, has now gone into production at A-MEK Verkstad in Sunne, and the first tank has been transported up to Stockholm this weekend by a private airplane. It will now undergo high-pressure testing with pressures up to 150 atmospheres (150 bar) before it can be considered reliable for further use.

Introduktion (Svenska)

Välkommen till LAPLander-bloggen!

Den här sidan följer utveckligen av en rymdsond, "Light Airbag Protected Lander", vilken i konkurrens med mång övriga förslag har blivit utvald för att skjutas från kiruna med REXUS 8 i Mars 2010. Det hela sker som en del av Rexus-Bexus programmet. Mer information finns att hitta på projektets hemsida www.spp.ee.kth.se/rexus.

fredag 13 mars 2009

Introduction (English)

Welcome to the LAPLander blog!

This site follows the development of a space probe, the "Light Airbag Protected Lander", which in concurrence with many other proposals has been selected to be launched with the REXUS 8 rocket from Kiruna in March 2010, as a part of the
Rexus-Bexus programme.
More information on the project and the design can be found on our website:
www.spp.ee.kth.se/rexus.